目标
通过提供初始输入并传递处理后的输出以供下一阶段使用,从而允许在一系列阶段中进行数据处理。
解释
Pipeline模式为管道模式,也称为流水线模式。通过预先设定好的一系列的阶段来处理输入的数据,每个阶段的输出即是下一个阶段的输入。
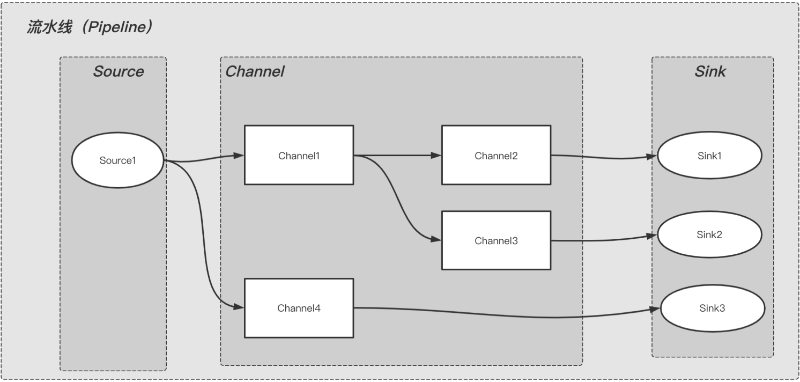
模型图如下:

从图中可以看出,整个流水线内数据流转是从上游到下游,上游的输出是下游的输入,按阶段依次执行。
Source: 表示数据来源,比如:KafkaSource。
Channel:表示对数据进行处理的组件,比如:JsonChannel,对数据进行json转换和处理。
Sink:表示数据落地或下沉的地方,比如:KafkaSink,表示数据发送到指定的kafka;DbSInk表示数据落地到DB。
可以看出,Pipeline是由Source(必须有),Channel(不一定需要),Sink(必须有)三种类型的组件自由组合而成的。
代码示例
/**
 *  生命周期
 */
public interface LifeCycle {
    /**
     *  初始化
     * @param config
     */
    void init(String config);

    /**
     *  启动
     */
    void startup();

    /**
     *  结束
     */
    void shutdown();
}
/**
 *  组件
 */
public interface Component<T> extends LifeCycle {
    /**
     *  组件名称
     * @return
     */
    String getName();

    /**
     *  获取下游组件
     * @return
     */
    Collection<Component> getDownStrems();

    /**
     *  执行
     */
    void execute(T o);
}
/** * 组件抽象实现 * @param <T> 输入 * @param <R> 输出 */ public abstract class AbstractComponent<T, R> implements Component<T>{ public void execute(T o) { // 当前组件执行 R r = doExecute(o); System.out.println(getName() + " receive " + o + " return " + r); // 获取下游组件,并执行 Collection<Component> downStreams = getDownStrems(); if (!CollectionUtils.isEmpty(downStreams)) { downStreams.forEach(c -> c.execute(r)); } } /** * 具体组件执行处理 * @param o 传入的数据 * @return */ protected abstract R doExecute(T o); public void startup() { // 下游 -> 上游 依次启动 Collection<Component> downStreams = getDownStrems(); if (!CollectionUtils.isEmpty(downStreams)) { downStreams.forEach(Component::startup); } // do startup System.out.println("--------- " + getName() + " is start --------- "); } public void shutdown() { // 上游 -> 下游 依次关闭 // do shutdown System.out.println("--------- " + getName() + " is shutdown --------- "); Collection<Component> downStreams = getDownStrems(); if (!CollectionUtils.isEmpty(downStreams)) { downStreams.forEach(Component::shutdown); } } }
/**
 *  数据来源
 */
public abstract class Source<T, R> extends AbstractComponent<T, R>{

}
/**
 *  数据处理
 */
public abstract class Channel<T, R> extends AbstractComponent<T, R> {

}
/**
 *  数据落地/下沉
 */
public abstract class Sink<T, R> extends AbstractComponent<T, R> {

}
上面我们封装了基本的组件实现,下面扩展一下具体的实现,用一个简单的例子说明:
IntegerSource -> IncrChannel -> StringChannel -> ConsoleSink
从上面组件名称和方向可以判断出来我们要做的流水线是什么,大概过程如:
输入一个数字 -> 数字+1 -> 转为字符串 -> 控制台输出
那么我们开始来实现这个过程吧。
/** * 来源 */ public class IntegerSource extends Source<Integer, Integer> { private int val = 0; protected Integer doExecute(Integer o) { return o; } public void init(String config) { System.out.println("--------- " + getName() + " init --------- "); val = 1; } public void startup() { super.startup(); execute(val); } public String getName() { return "Integer-Source"; } public Collection<Component> getDownStrems() { return Collections.singletonList(new IncrChannel()); } }
/** * 处理:数字+1 */ public class IncrChannel extends Channel<Integer, Integer> { protected Integer doExecute(Integer o) { return o + 1; } public String getName() { return "Incr-Channel"; } public Collection<Component> getDownStrems() { return Collections.singletonList(new StringChannel()); } public void init(String config) { } }
/** * 处理:转为字符串 */ public class StringChannel extends Channel<Integer, String> { protected String doExecute(Integer o) { return "str" + o; } public String getName() { return "String-Channel"; } public Collection<Component> getDownStrems() { return Collections.singletonList(new ConsoleSink()); } public void init(String config) { } }
/** * 控制台 */ public class ConsoleSink extends Sink<String, Void> { protected Void doExecute(String o) { return null; } public String getName() { return "Console-Sink"; } public Collection<Component> getDownStrems() { return null; } public void init(String config) { } }
好了,扩展实现已完成,整个流水线基本已设置好,我们来测试一下吧
/** * 流水线 */ public class Pipeline implements LifeCycle{ /** * 数据源 */ private Source source; public Pipeline(Source source) { this.source = source; } public void init(String config) { // 初始化 System.out.println("--------- Pipeline init --------- "); source.init(null); } public void startup() { // 启动 System.out.println("--------- Pipeline startup --------- "); source.startup(); } public void shutdown() { // 结束 source.shutdown(); System.out.println("--------- Pipeline shutdown --------- "); } }
Pipeline pipeline = new Pipeline(new IntegerSource());
pipeline.init(null);
pipeline.startup();
pipeline.shutdown();
执行后结果如下:
--------- Pipeline init ---------
--------- Integer-Source init ---------
--------- Pipeline startup ---------
--------- Console-Sink is start ---------
--------- String-Channel is start ---------
--------- Incr-Channel is start ---------
--------- Integer-Source is start ---------
Integer-Source receive 1 return 1
Incr-Channel receive 1 return 2
String-Channel receive 2 return str2
Console-Sink receive str2 return null
--------- Integer-Source is shutdown ---------
--------- Incr-Channel is shutdown ---------
--------- String-Channel is shutdown ---------
--------- Console-Sink is shutdown ---------
--------- Pipeline shutdown ---------
总结
本文我们介绍了常见的设计模式之Pipeline模式,并通过简单的代码示例说明了这种模式的实现及目标。

